
Today I'm going to make a tutorial about how to create digital bottle cap images.
English is not my mother tongue, so I hope you'll understand everything !
Let's start !
1. Using photofiltre
We will be using using Photofiltre 7.
The software is free and available here: http://www.photofiltre-studio.com/pf7-en.htm
You can download and install it in your computer.
2. Open the page
First open photofiltre.
Open a new file by clicking on the white page top left button (as in the picture)

This will open a new tab (picture 2) where you will choose the size of your page and the resolution.
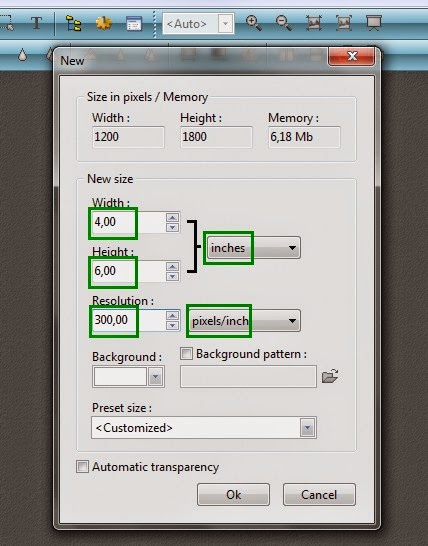
Size
We will be using a 4 x 6 inches page. Make sure that "inches" are selected and not centimeters (except if you want centimeters of course!).
If you are using 8.5 x 11 inches paper or another size, you can change the size.
Resolution
The resolution is the number of pixels per inch or per centimeters.
The standard resolution is 300 per inch
Select the white background.
Click ok.
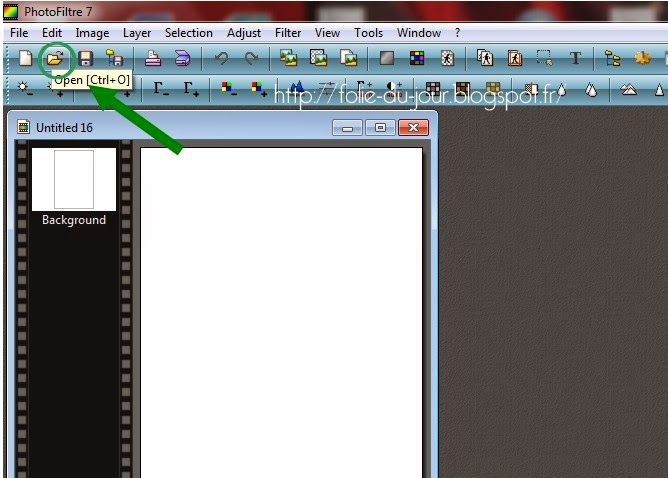 Now that you have open the page, you need to open the image you want to use for your bottle cap images.
Click on the button as seen on picture 3
Then browse your computer on the file of your image and open it.
I will use an image from Frozen for the example.
Now you should have 2 files, one with your image and one white.

3. Create the round image
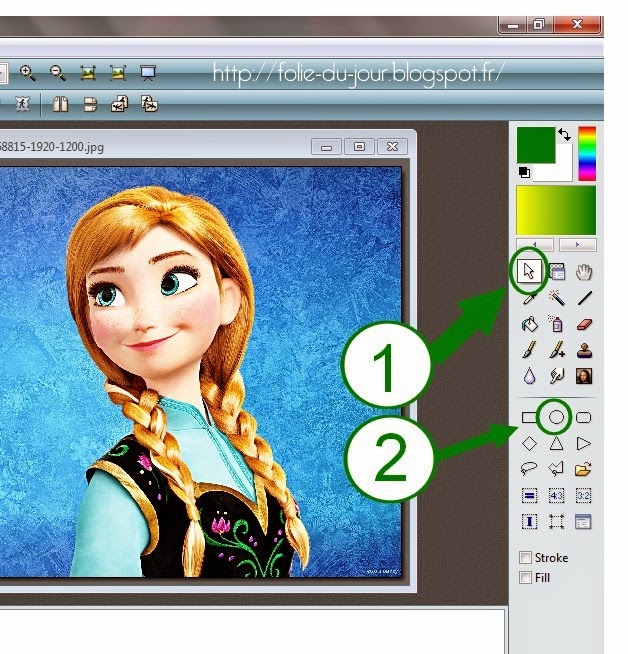
Click on the "selection tool"
then click on the "ellipse"
Then, put the arrow of your mouse inside your image at the top left.
Click left
Slowly drag from top left to bottom right of the image. This will create a circle.
Important: while you are doing that, you need to click left on the same time
When you are done you can stop clicking.
You will have something like that on your image:
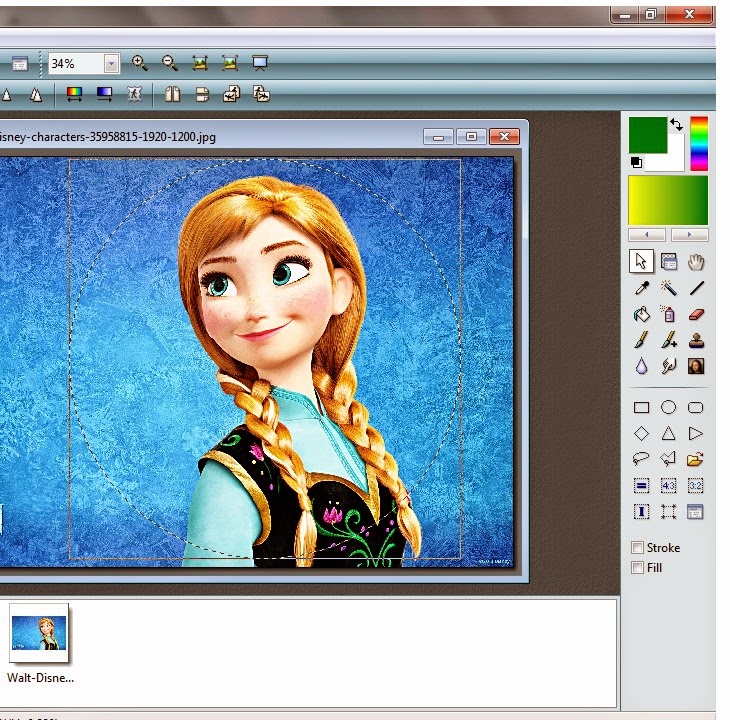
Now we want to make sure that the circle is round and not oval.
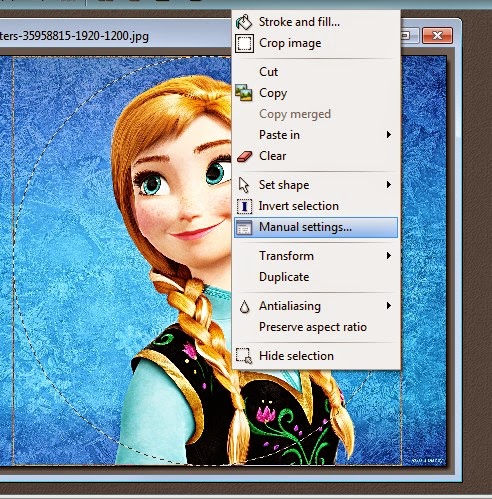
When you mouse is inside the circle, click right.
Then select Manual settings

Here the number of pixel is not the same for the width and the height.
This mean that the round is a little bit oval.

Uncheck "Preserve aspect ratio" (otherwise the width and height will change proportionally).
Then change one number so that they are both equal.
Click Ok
When you did that. Make sure that the circle is not bigger than your image. If it is, then change the numbers for something smaller.
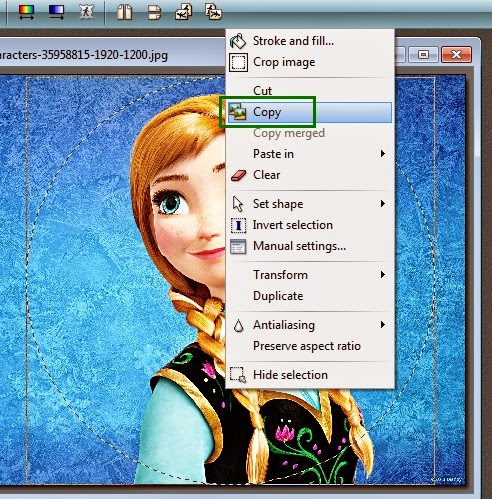
Now, with your mouse inside the circle, click right and select "copy".
Select your white page.
Click right on it, select "Paste"
You will have something like that:

4. Resize the round image

This is great ! But the round image is far too big !
Select the "Layer manager tool" (1) then click right on the round and select "manual settings" (2)
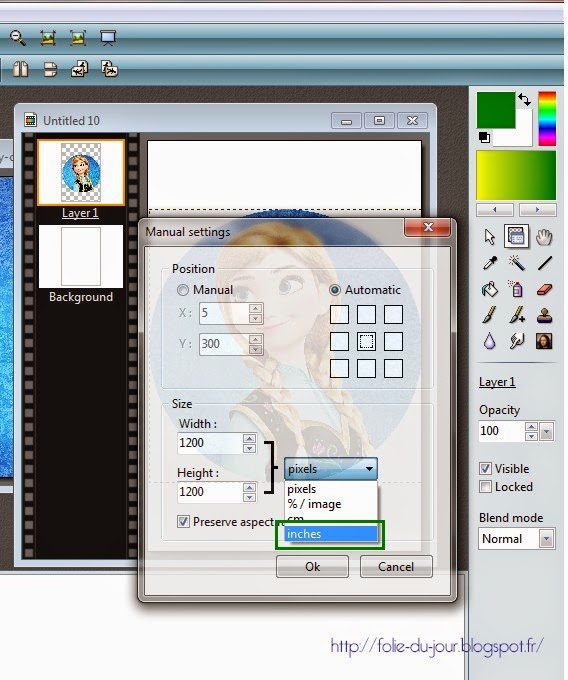
Change from pixel to "inches"
We want 1" bottle cap images.
So put 1 as width (the height will automatically change).
If you need another size like 2 or 3 inches just put this number instead of 1.

Now you have a 1 inch digital bottle cap images.
Congratulations !
You can move it in another place on the white page.
Just click left and move it around (you need to click on the same time).
Now you can copy and paste it several times if you want the same image.
Or you can do the same tutorial for another image on the same page.
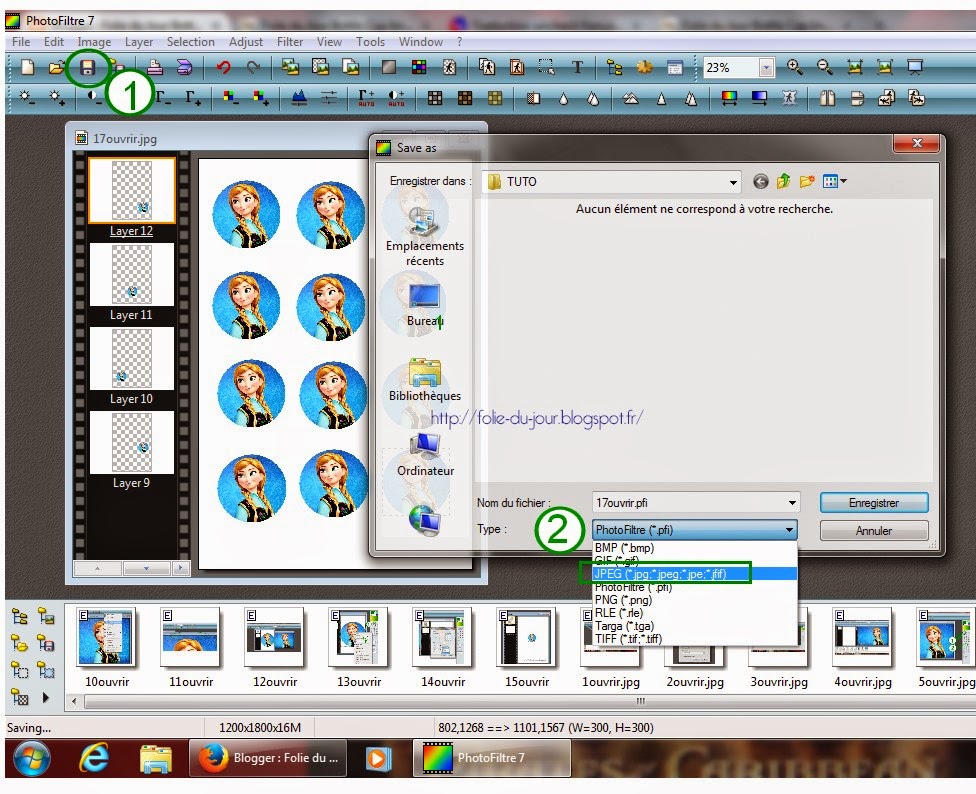 Don't forget to save.
1. click on the diskette
2. Select JPEG
3. Change the name of the file
4. Click save
You're done !
Hope this will help ! don't hesitate to share on the comments.
If you have any questions, don't hesitate to ask me on the comments.
Hi Marion, thank you for doing this step by step tutorial!! I had some questions please :) 1) when saving there are 2 pop ups..first asking if you want to save as the jpeg version does not support layers.
RépondreSupprimerAlso, if I wanted to make 2 or 3inch images, but NOT in the round bottlecap shape, how would I do that please?
Many thanks!
Hi Kitty,
RépondreSupprimerYou can ignore the pop ups. But you can also save first as .pfi . This will allow you to keep the several layers and to make changes later. But for printing, you'll need a jpeg.
On the tutorial, when I write: "Click on the "selection tool" then click on the "ellipse". Instead of the ellipse you can select the square or triangle. If you need an oval, you can select the ellipse and change the size accordingly.
Hope this will help,
Marion
Couple questions. Do you know where I can buy bulk resigns for the center of the bow? Like jewels and figure of characters. Can we do different pictures on one sheet?
RépondreSupprimerThank you so much for the tutorial, I love all of your images.
RépondreSupprimerBest tutorial and program I have found. I have photoshop but even after watching so many videos I still cannot figure out how to do the bottle caps. I do have a question however, I have looked and looked but most tutorials are in different languages. How can I resize my photo/image to fit the whole design into the shape I am doing (circle for bottle caps). I'm always cutting so much off and I would like to be able to get the whole image/clip art into it but cannot figure it out.
RépondreSupprimerHi, one question when I print the image came close to In.
RépondreSupprimerI save the picture exactly like you said :(